Setting up TeamSpeak 3 TSDNS and SRV resource records can be a challenge for the inexperienced. Looking for support on the TeamSpeak forums is nearly impossible (that’s putting it nicely). The purpose of TeamSpeak SRV and TSDNS records are to give your friends, the public, whomever the ability to remember your server without remembering ports and also gives you the ability to change ports without the need to notify everybody that your server ports changed.
Example without SRV records: TS.MyTeamSpeakServer.Com:17264
Example with SRV records: TS.MyTeamSpeakServer.com
Here is how you setup TeamSpeak SRV and TSDNS records on a Windows DNS server and in GoDaddy with verification steps (using Windows NSLOOKUP).
In this example we have one TeamSpeak server resolving on to two DNS names: TS1.JLTCtech.com and TS.Kronos-Industries.com.
JLTCtech.com exists on my Windows DNS server and Kronos-Industries.com exists in GoDaddy. Adjust your scenario based on your domain name.
Windows DNS
- Launch a command prompt (Windows key + R and type “CMD” and press enter).
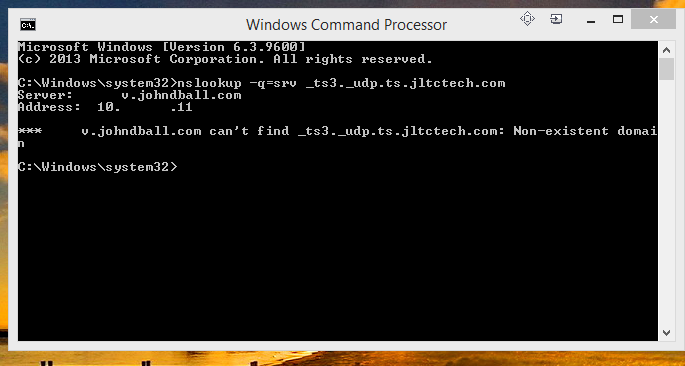
- Type: “nslookup -q=srv _ts3._udp.ts.YourDomain.com” and press enter. You should get NO results. If you do get a result, you already have an SRV record somewhere.
- Launch DNS manager on your DNS server.
- Find your domain name, right click on it, select “New Host (A or AAAA)“.
- Name (user parent domain name if blank): “TS“.
- IP address: (IP address of your TS server).
- Click “Add Host“.
- Find your domain name, right-click on the domain name, and select “New Domain“. Give it a name such as “TS“. This is going to create a sub-domain of “TS” within your parent domain.
- Right-click on the new domain “TS” and select “Other New Record“.
- Find Service Location (SRV) record in the list and select “Create Record“.
- Domain should be auto-populated with “TS.YourDomain.com”.
- Service: “_ts3“.
- Protocol: “_udp“.
- Priority: “1” (one).
- Weight: “0“.
- Port number: “9987” (or your TeamSpeak port).
- Host offering this service: “TS.YourDomain.Com“.
- Click OK.
- Still within the “Resource Record Type” window, ensure “Service Location (SRV)” is still selected and click “Create Record“.
- “Domain” should be auto-populated with “TS.YourDomain.com”.
- Service: “_tsdns“.
- Protocol: “_tcp“.
- Priority: “0“.
- Weight: “0“.
- Port number: “41144” (or your TeamSpeak TSDNS port).
- Host offering this service: “TS.YourDomain.com“.
- Click OK.
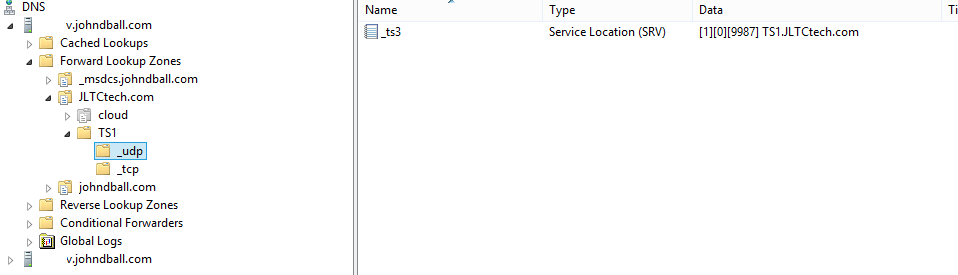
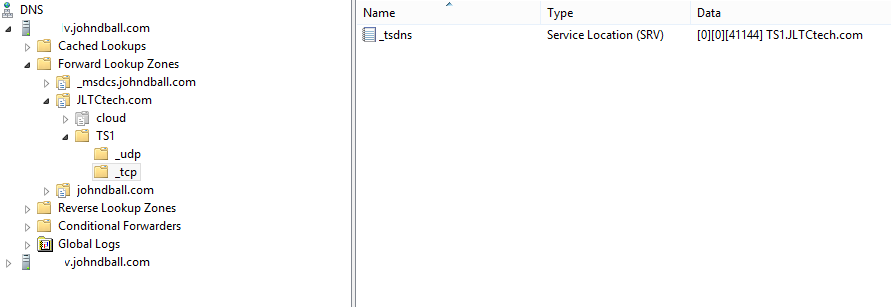
- At this point you should have two SRV records similar to the pictures below:

- Relaunch NSLOOKUP from a command prompt and retry the following two commands. You should get a returned DNS response for each command: “nslookup -q=srv _ts3._udp.ts.YourDomain.com” (press enter) and
“nslookup -q=srv _tsdns._tcp.ts.YourDomain.com” (press enter).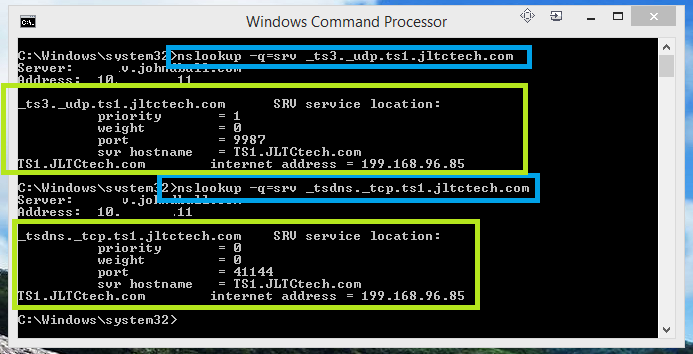
- At this point I would attempt to log in to your TeamSpeak server using TeamSpeak 3 client and the settings we used above. Ensure that your computer that is running TeamSpeak is using the DNS server address of the server for which we created the records above.
- Your TeamSpeak Client Logs should look like this:
[code] 3/3/2017 14:03:20 TSDNS Info A/AAAA DNS resolve successful, "ts1.jltctech.com" =(h: 199.168.96.85 p:0)

3/3/2017 14:03:20 TSDNS Info A/AAAA DNS resolve successful, "jltctech.com" DNS server returned answer with no data

3/3/2017 14:03:20 TSDNS Info SRV DNS resolve successful, "_tsdns._tcp.jltctech.com" =(h: TS1.JLTCtech.com p:41144)

3/3/2017 14:03:20 TSDNS Info SRV DNS resolve successful, "_ts3._udp.ts1.jltctech.com" =(h: TS1.JLTCtech.com p:9987)

3/3/2017 14:03:20 TSDNS Info A/AAAA DNS resolve for possible TSDNS successful, "ts1.jltctech.com" =(h: 199.168.96.85 p:0)

3/3/2017 14:03:20 TSDNS Info A/AAAA DNS resolve successful, "TS1.JLTCtech.com" =(h: 199.168.96.85 p:0)

3/3/2017 14:03:20 ClientUI Info Lookup finished: ip=199.168.96.85 port=9987 query=ts1.jltctech.com error=0

3/3/2017 14:03:20 ClientUI Info Resolve successful: 199.168.96.85:9987

3/3/2017 14:03:20 ClientUI Info Blacklist check ok

3/3/2017 14:03:20 ClientUI Info Initiating connection: 199.168.96.85:9987

3/3/2017 14:03:20 TSDNS Info A/AAAA DNS resolve successful, "blacklist.teamspeak.com" =(h: 46.105.112.65 p:0)

3/3/2017 14:03:20 ClientUI Info Connect status: Connecting

3/3/2017 14:03:20 PktHandler Devel Puzzle solve time: 5

3/3/2017 14:03:21 ClientUI Info Connect status: Connected
GoDaddy DNS
- Launch a command prompt (Windows key + R and type “CMD” and press enter).
- Type: “nslookup -q=srv _ts3._udp.ts.YourDomain.com” and press enter. You should get NO results. If you do get a result, you already have an SRV record somewhere.
- Log in to GoDaddy and drill down to your DNS settings.
- GoDaddy has two DNS management systems. The “old” system (which is much easier to use) and the “new” system which just lists all your DNS entries. We will be using the new DNS system.
- Click the “ADD” button at the bottom right of the page.
- Select “SRV“.
- Service: “_ts3“.
- Protocol: “_udp“.
- Name: “TS“.
- Target: “TS.YourDomain.com“.
- Priority: “0“.
- Weight: “0“.
- Port: “9987” (or your TeamSpeak port).
- TTL: “1/2 hour” (while we are testing. Once it works, change it to a day unless your TeamSpeak IP address changes frequently).
- Click “save“.
- Click the “ADD” button at the bottom right of the page.
- Select “SRV“.
- Service: “_tsdns“.
- Protocol: “_tcp“.
- Name: “TS“.
- Target: “TS.YourDomain.com“.
- Priority: “1“.
- Weight: “0“.
- Port: “41144” (or your TeamSpeak port).
- TTL: “1/2 hour” (while we are testing. Once it works, change it to a day unless your TeamSpeak IP address changes frequently).
- Click “save“.
- Click the “ADD” button at the bottom right of the page.
- Select “A“.
- Host: “TS“
- Points to: (your TeamSpeak server public IP. Do NOT use an IANA reserved/private IP address like 192.168.x or 10.x (I forgot what the 172 block is)).
- TTL: “1/2 hour” (while we are testing. Once it works, change it to a day unless your TeamSpeak IP address changes frequently).
- Click “save“.
- *A little caveat here. Just because you hit “save” doesn’t mean that the entire global fleet of publicly available DNS servers immediately got your changes. It can take hours to replicate your changes. Just because you don’t get a response doesn’t mean that what you did failed. Try now, try again in 30 minutes, try again in 2 hours. If after 2 hours you get nothing, leave a comment below and I’ll try to help as much as I can.
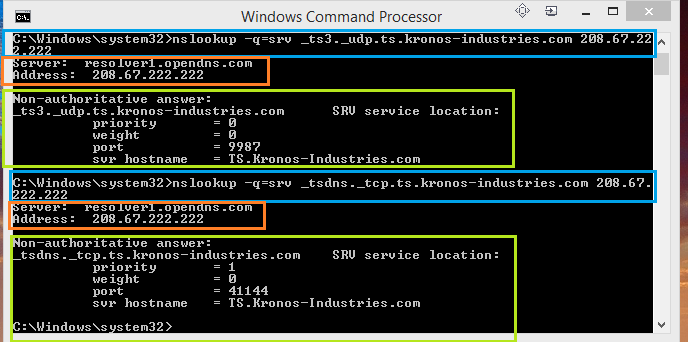
- Launch a command prompt (Windows key + R and type “CMD” and press enter). We want to resolve our new records using OpenDNS servers. Type the following command in the window:
“nslookup -q=srv _ts3._udp.ts.YourDomain.com 208.67.222.222” (press enter).
“nslookup -q=srv _tsdns._tcp.ts.YourDomain.com 208.67.222.222” (press enter). - You should get two responses like the one in the picture below. This means that our TeamSpeak DNS records are now publicly available for query (and hopefully connectivity):
- If you’ve configured your firewall, port forwarding, and security rules correctly, attempt to connect to your TeamSpeak server using your TeamSpeak client not using the internal DNS server we used in the first half of this guide (if that is applicable). Otherwise, you should resolve correctly in your TeamSpeak client.
Happy gaming.
hi
I have godady domain and hosting Cpanel Linux I installed ts3 but it doesn’t work what’s problem I don’t know . Could you help me please ?
Attachment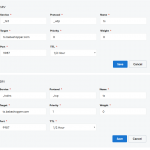
It looks like you are missing the TSDNS TCP entry. Although I see it in your screenshot, it is not being published or is not available.
https://mxtoolbox.com/SuperTool.aspx?action=srv%3a_tsdns._tcp.ts.babashopper.com&run=toolpage#
Attachment