Ivan Ristić at Hardenize summed up MTA-STS perfectly and I’ll quote him to provide some background on our exercise in this post:
“Traditionally, a big security problem with SMTP is that encryption is entirely optional. When support for upgrading from plaintext to encryption in the form of the STARTTLS command was added to SMTP (RFC 3207), the specification explicitly specified that SMTP servers must accept plaintext connections. Thus, without further work, our current SMTP infrastructure can defend only against passive attacks. Although that’s extremely valuable when compared to the plaintext-only alternative where email is globally passively recorded at massive levels, it leaves a lot to be desired if you’re important enough to be targeted directly via active network or man-in-the-middle (MITM) attacks” REF
In this post I’ll show you how to add MTA-STS to protect your SMTP communication channel leveraging Cloudflare, Apache on Ubuntu Linux, and Google Apps for Business Email. These steps were derived from Ayke van Laëthem’s blog post and modified for my particular setup. This setup is based upon the June 2018 Draft 21 of the MTA-STS standard and more information about the draft can be found here.
There are a few assumptions I’ll be making on this exercise:
- You’re using Cloudflare for DNS and certificates for server HTTPS encryption (if not, modify as needed)
- You’re using Apache on Ubuntu Linux (if not, modify as needed for IIS, Tomcat, or other app/OS)
- You’re using Google Apps for Business Email (if not you’ll need your MX server addresses)
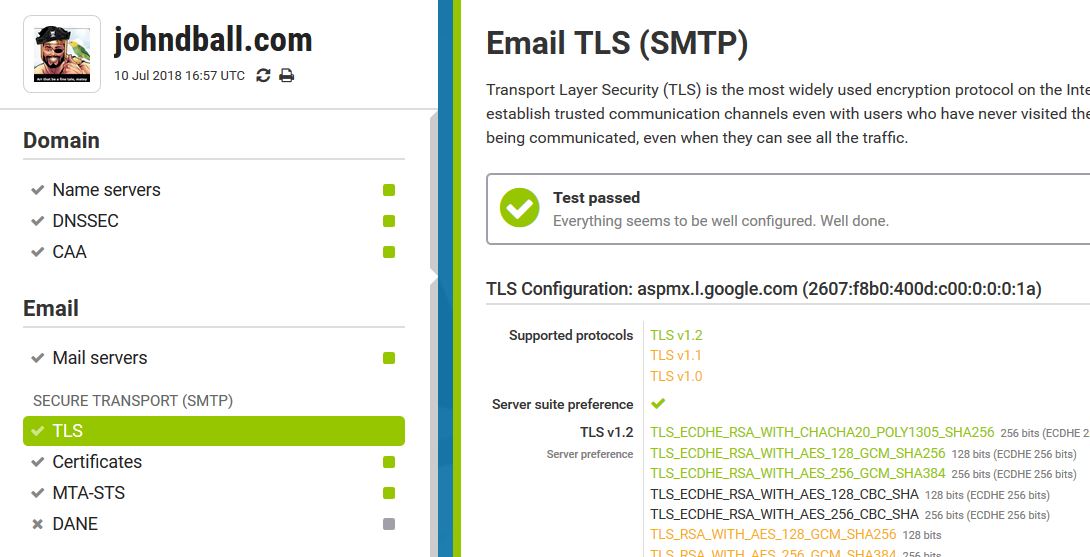
- You have a properly configured STARTTLS for your email (use Hardenize to check; a properly configured STARTTLS result looks like this)
Cloudflare
To get started with MTA-STS, you’ll need to add a few entries to your DNS records:
- Add a TXT record containing the following:
v=TLSRPTv1; rua=mailto:someemail @example.com

- Add a TXT record containing the following:
v=STSv1; id=20160831085700Z. Note that the ID field is taken straight from the draft IETF RFC and is used to track policy changes.

"id": (plain-text, required). A short string used to track policy updates. This string MUST uniquely identify a given instance of a policy, such that senders can determine when the policy has been updated by comparing to the "id" of a previously seen policy. There is no implied ordering of "id" fields between revisions. - Add a pointer to a subdomain which can publicly serve the configuration file using a CNAME, A, or AAAA record. My record is a CNAME of mta-sts.johndball.com pointing to my DMZ gateway firewall sitting in front of my web server.

- Save your changes in Cloudflare and enable developer mode to ensure you won’t return cached results. Remember to disable developer mode once your tests are successful. Let’s move on to the configuration file setup in Apache.
Apache
-
- Once again, modify based on your setup. Access your Apache configuration and create a new web directory, create the configuration file, make blank index.html files to prevent directory browsing (not needed but I don’t like leaving things “open” so to speak), and change the permissions to the Apache user “www-data”:
mkdir /var/www/mta-sts.yourdomain.com/.well-known

touch /var/www/mta-sts.yourdomain.com/.well-known/mta-sts.txt

touch /var/www/mta-sts.yourdomain.com/index.html

touch /var/www/mta-sts.yourdomain.com/.well-known/index.html

chown www-data:www-data /var/www/mta-sts.johndball.com/ -R
- Once again, modify based on your setup. Access your Apache configuration and create a new web directory, create the configuration file, make blank index.html files to prevent directory browsing (not needed but I don’t like leaving things “open” so to speak), and change the permissions to the Apache user “www-data”:
- Next create the site configuration file.
nano /etc/apache2/sites-available/mta-sts.yourdomain.com.conf
Note: I am using HTTPS, HSTS, Cloudflare Origin Cert, and strong DH parameters. Remove the “VirtualHost *:443” section if you aren’t serving sites using HTTPS or the last four lines in the configuration if you aren’t using HTST, an Origin Cert pull, or strong ciphers (Logjam vulnerability fix).
#

# Example.com (/etc/apache2/sites-available/www.example.com)

#

<VirtualHost *:80>

ServerAdmin email @example.com

ServerName mta-sts.YourDomain.com

# Indexes + Directory Root.

DirectoryIndex index.php

DocumentRoot /var/www/mta-sts.YourDomain.com

</VirtualHost>
<IfModule mod_ssl.c>

<VirtualHost *:443>

ServerAdmin email @example.com

ServerName mta-sts.YourDomain.com

DocumentRoot /var/www/mta-sts.YourDomain.com

SSLEngine on

Header always add Strict-Transport-Security "max-age=31536000"

SSLCertificateFile /etc/apache2/ssl/YourCloudFlareCert.pem

SSLCertificateKeyFile /etc/apache2/ssl/YourCloudFlareCert.key

SSLOpenSSLConfCmd DHParameters "/etc/apache2/ssl/dhparams_4096.pem"

</VirtualHost>

</IfModule>
- Next configure the mta-sts.txt file that you created earlier.
nano /var/www/mta-sts.yourdomain.com/.well-known/mta-sts.txt
The configuration here is listed for Google mail servers and a wildcard for the on-prem servers. Modify based on your email host(s). Set the “max_age” to a low value and set “mode: testing” while testing functionality. Slowly raise “max_age” to days, weeks, and months once testing is completed and successful and switch to “mode: enforce”.
version: STSv1

mode: enforce

max_age: 3600

mx: *.yourdomain.com

mx: aspmx.l.google.com

mx: alt1.aspmx.l.google.com

mx: alt2.aspmx.l.google.com

mx: aspmx2.googlemail.com

mx: aspmx3.googlemail.com
- Lastly, enable your site configuration and reload Apache to make your site live.
a2ensite /etc/apache/sites-available/mta-sts.yourdomain.com/config
service apache2 reload
Testing
If you’ve followed along up to this point, and I didn’t overlook anything, you should be able to now test against your configuration. Open a browser and navigate to https://mta-sts.yourdomain.com/.well-known/mta-sts.txt and you should see your configuration file. Mine is here: https://mta-sts.johndball.com/.well-known/mta-sts.txt.
Next go to Hardenize (here) and Internet.NL (here) and check your site configuration. A properly configured site on Hardenize (here) will show a green box next to the MTA-STS section.
 Lastly, send a few test emails to ensure a working configuration and disable developer mode in Cloudflare.
I hope this guide has helped you deploy MTA-STS under the current draft configuration standards and strengthened your environment’s security posture. If you have any troubles or issues please leave me a message in the comments section.
Thanks to Ayke van Laëthem and the blog post that steered me in the right direction and Ivan Ristić at Hardenize for the great explanation of MTA-STS and for providing a great tool to check server configurations.