Howdy! Just a heads up, this post is MANY years old. If you found this link on an external site, have no fear! I have a newer post here: https://www.johndball.com/2022-update-compiling-sharkrf-connector-server-on-ubuntu-22-04-1-lts/
73! ~KN4OLA
I wanted to get the SharkRF web page up on my SharkRF Connector Server and auto-start the SharkRF service. In addition, I wanted the service to not run as a sudoer (administrator). I’ve documented my setup below.
Change log
Original – 18 January 2018
REV 1 – 19 January 2018 – Added lines 6, 7, 8, 10. Added reference to Github. Added external URL for Apache2 directory modification. Added step for copying config.inc.php.
REV 1.1 – 21 January 2018 – Added lines 13, 13(1), and 14.
REV 1.2 – 21 January 2018 – edited content for flow (thanks @Dano3131)
REV 1.3 – 16 January 2019 – added section for apache2.conf change under prerequisites; fixed a typo under the crontab section
Prerequisites
-
- You will need Apache2 and PHP installed for this deployment.
Follow this guide just don’t install MySQL. - You will need to allow Apache2 to navigate to directories outside of /var/www. This can be completed by changing /etc/apache2/apache2.conf file, in the section labeled “Directory /var/www/html”, to
Options Indexes FollowSymLinks

AllowOverride None

Require all granted - Once Apache2 is installed, you will need to change your Apache2 default directory (if you followed my compile post) to
/var/sharkrf/srf-ip-conn-srv/dashboard
- You will need Apache2 and PHP installed for this deployment.
Setup
Next, we want to auto start the RF server service and not run as root. We also want to set proper directory permissions.
adduser sharkservice- Set password, skip the remaining questions
cd /var/sharkrf/srf-ip-conn-srv/dashboard/cp config-example.inc.php config.inc.phpcd /var/sharkrf/srf-ip-conn-srvcp config-example.json build/Release/cd /var/sharkrf/srf-ip-conn-srv/build/Releasemv config-example.json config.jsonchmod 755 config.json- This will make the config.json file the same perms as the srf-ip-conn-srv binary. Edit config.json according to the Github install instructions.
cd /varchown sharkservice:sharkservice sharkrf -Rcd /var/sharkrf/srf-ip-conn-srvchown www-data:www-data dashboard -Rnano /etc/apache2/sites-enabled/000-default.conf- Change “DocumenRoot /var/www/html” to DocumentRoot
/var/sharkrf/srf-ip-conn-srv/dashboard/
- Change “DocumenRoot /var/www/html” to DocumentRoot
service apache2 restart
Next we want to make sure that our service starts as our “sharkservice” user.
su sharkservicecd /var/sharkrf/srf-ip-conn-srv/build/Release./srf-ip-conn-srv -f
At this point you should see the service running as your service account. Navigate to your server in a web browser on port 80. You should also see your server details in the web page. 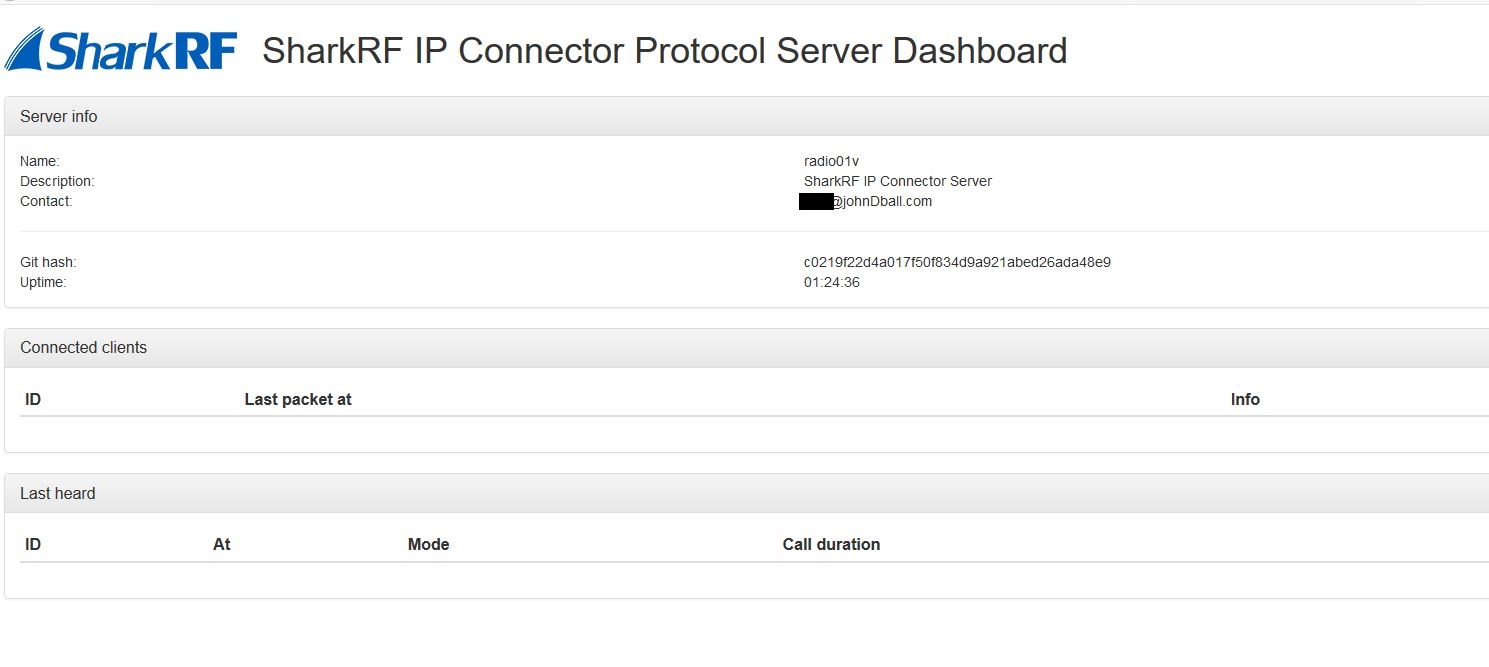 Go ahead and CTRL+C that (killing the program).
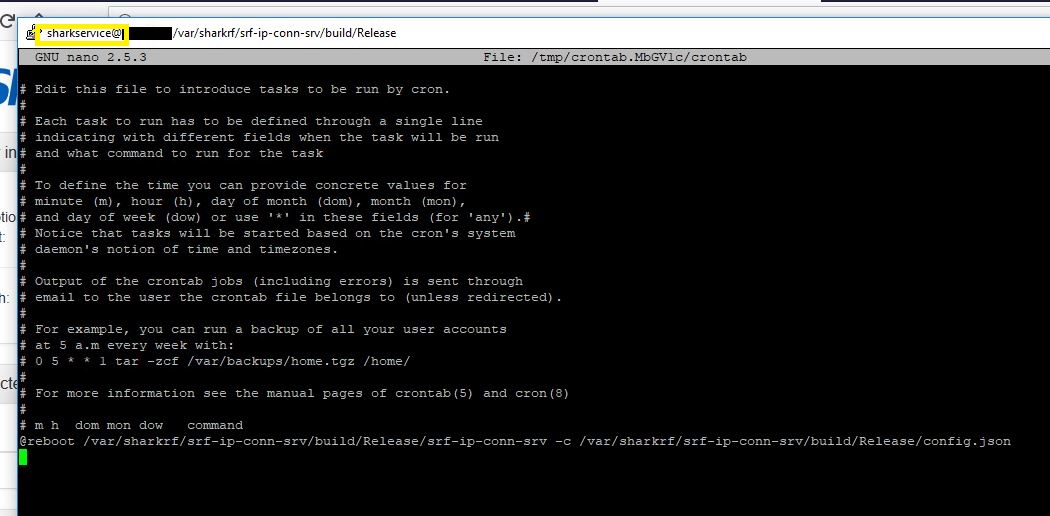
crontab -e- Put in this command exactly. This will start your program upon a server reboot:
@reboot /var/sharkrf/srf-ip-conn-srv/build/Release/srf-ip-conn-srv.sh -c /var/sharkrf/srf-ip-conn-srv/build/Release/config.json- If you don’t explicitly include -c and the full path to the config.json file then the program will never run. Digging through the syslog file you would find “path to config.json not found” on reboot when the system tries to start the program.
- Add an extra line after your command in crontab (just put the command in and press enter again) then save crontab.
exitshutdown -r now
At this point your server should reboot, the web page should throw errors. Once the server comes back up your web page can be refreshed, the errors should go away and you should see your RF server details.
Bam! Auto start program under a non sudoer and displaying your RF server in an Apache web page.
Couldn’t be easier. (<– I say that but it took me about 4 days to figure out this 10 minute post).
Related: Preconfigured SharkRF VMX and VMDK
Related: Setting up the SharkRF server on Ubuntu Linux
Help…!
Thanks for the great step-by-step walkthrough, I have little experience with Linux, but managed to get near the end.
One major problem, when the dashboard opens, I keep getting errors. (can’t open Unix socket file to server: no such file or directory.
What am I doing wrong/missing here?
Thanks a lot!! regards, G
Apologies, just now seeing this. The comment was marked as spam.
Sounds like you are getting the dashboard to open but the service isn’t running. You’ll get that error if you can connect to the dashboard but the backend service is down.
Can you confirm that the service is running? Can you also send a screenshot of the error? Feel free to email me a screenshot at johnDball–at–johnDball–dot–com.