I’ve been running a FlightAware ADS-B receiver since May 2019 and it has been feeding FlightAware, Virtual Radar, and ADSBexchange without issue for 4 years now (wow!). It has been servicing the Louisa, Virginia area, specifically my nearest airport which is (K)LKU.
Recently, I became interested in UAT 978 (978 MHz) which is alternative to ADS-B 1090 (1090 MHz) with certain caveats. The theory behind UAT 978 is that it will alleviate congestion within the ADS-B 1090 space for pilots that do not fly in Class A airspace but only fly in Class E airspace (below 18,000 feet MSL) or below and stay within the confines of the United States (although Mexico and Canada may allow it – check my math on this statement). To help with adoption, the FAA has incentivized UAT 978 adoption by providing free Flight Information Service Broadcast (FIS-B), NOTAM, and weather activity in supported areas.
 Since UAT 978 is relatively new, adoption isn’t as widespread as it will be a few years from now but I was still missing out. Not being one that enjoys being in the dark, I snagged an AirNav UAT 978 receiver and AirNav UAT 978 antenna.
Once the two items arrived, I installed the UAT 978 antenna next to my ADS-B antenna with the help of my daughter. 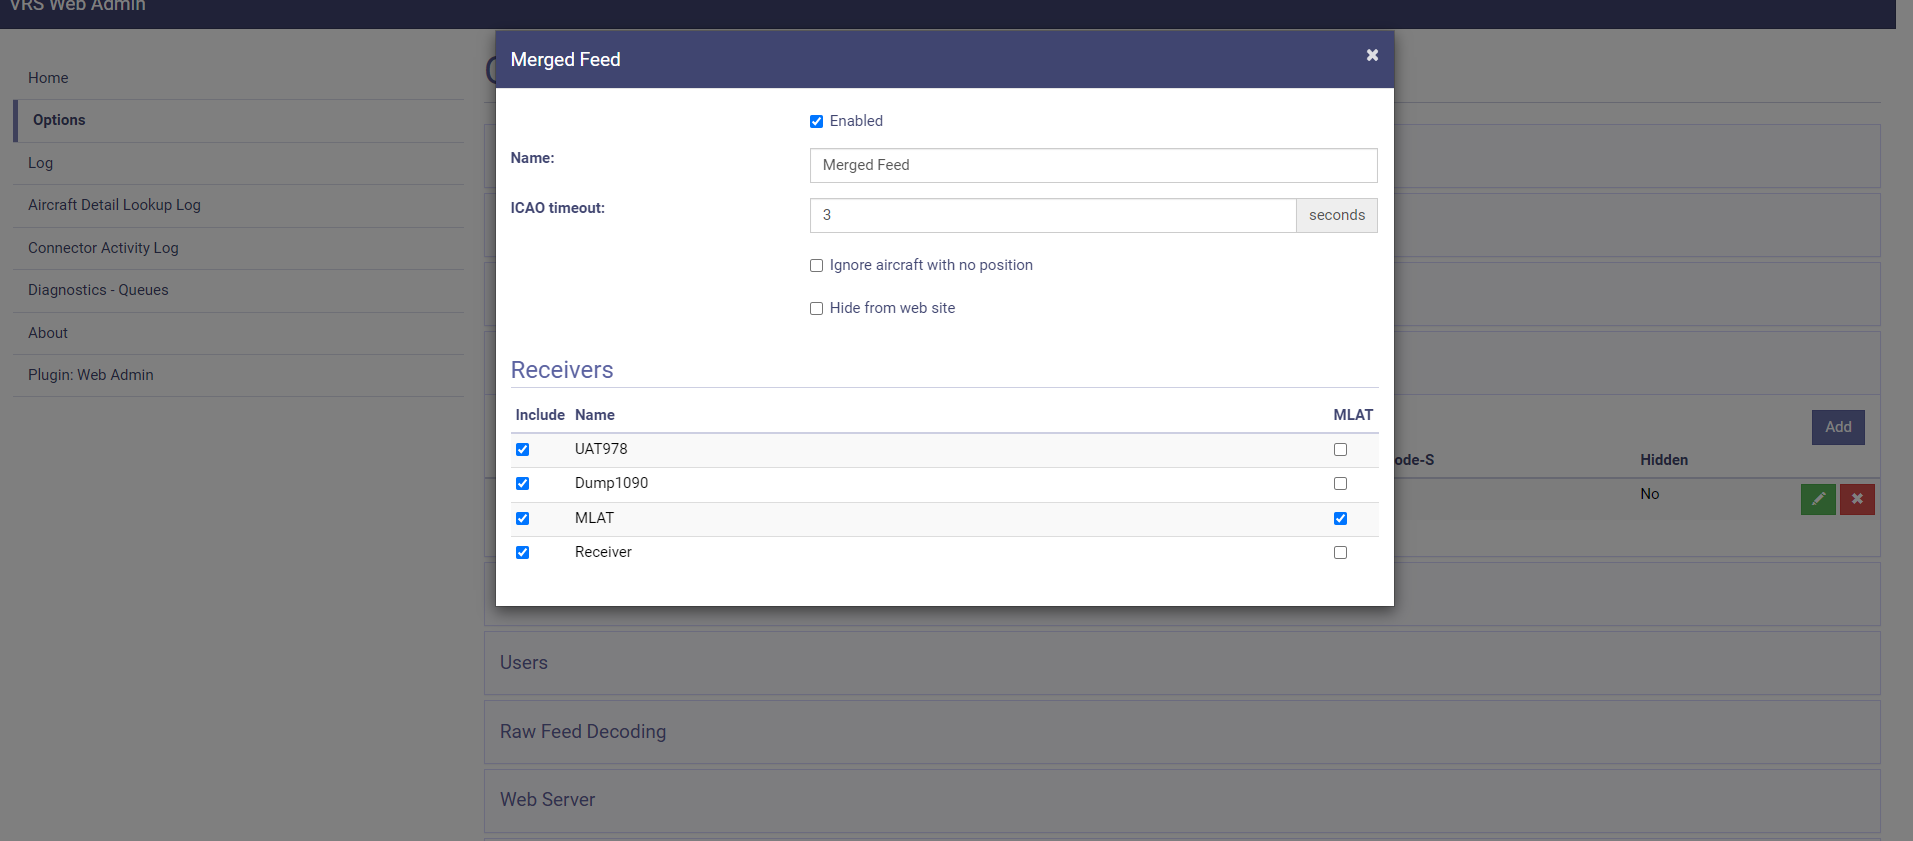 Once the hardware was in place, there was some coding and legwork needed to get UAT 978 service working on my Raspberry Pi. I used the following guides in the order below!
Keep in mind that if you are already running FlightAware (PiAware) and start feeding UAT 978 to FlightAware and you are using ADSBexchange then ADSBexchange will automatically receive UAT 978 data from your Raspberry Pi. There is no longer a need to configure ADSBexchange feeding as UAT 978 is automatically sent to ADSBexchange when your device supports it. This is a recent improvement to ADSBexchange. However, I had to manually configure Virtual Radar to receive UAT 978 on the local device, but it was easy (skip down below).
To configure your Pi for UAT 978:
- FlightAware – https://flightaware.com/adsb/piaware/build – Go to section 8 for “978 UAT Setup Instructions”
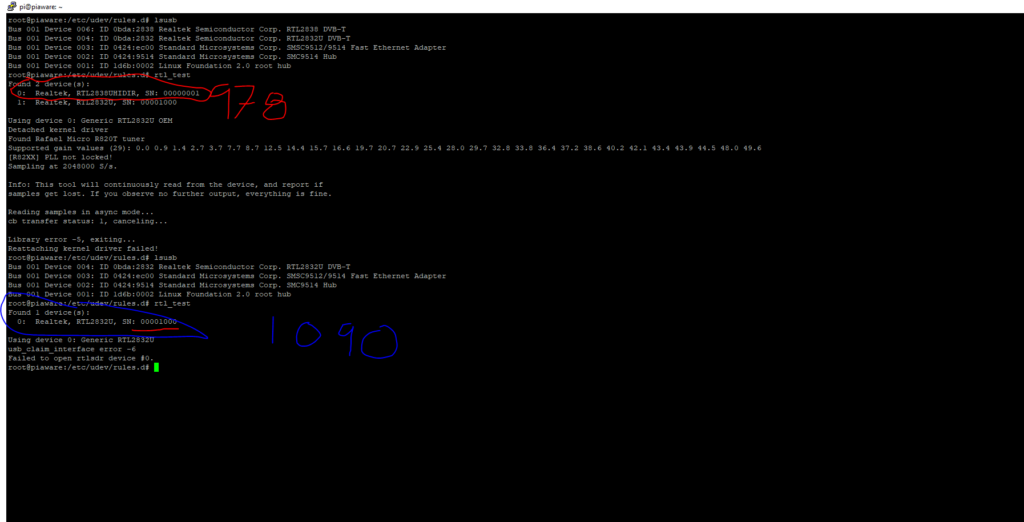
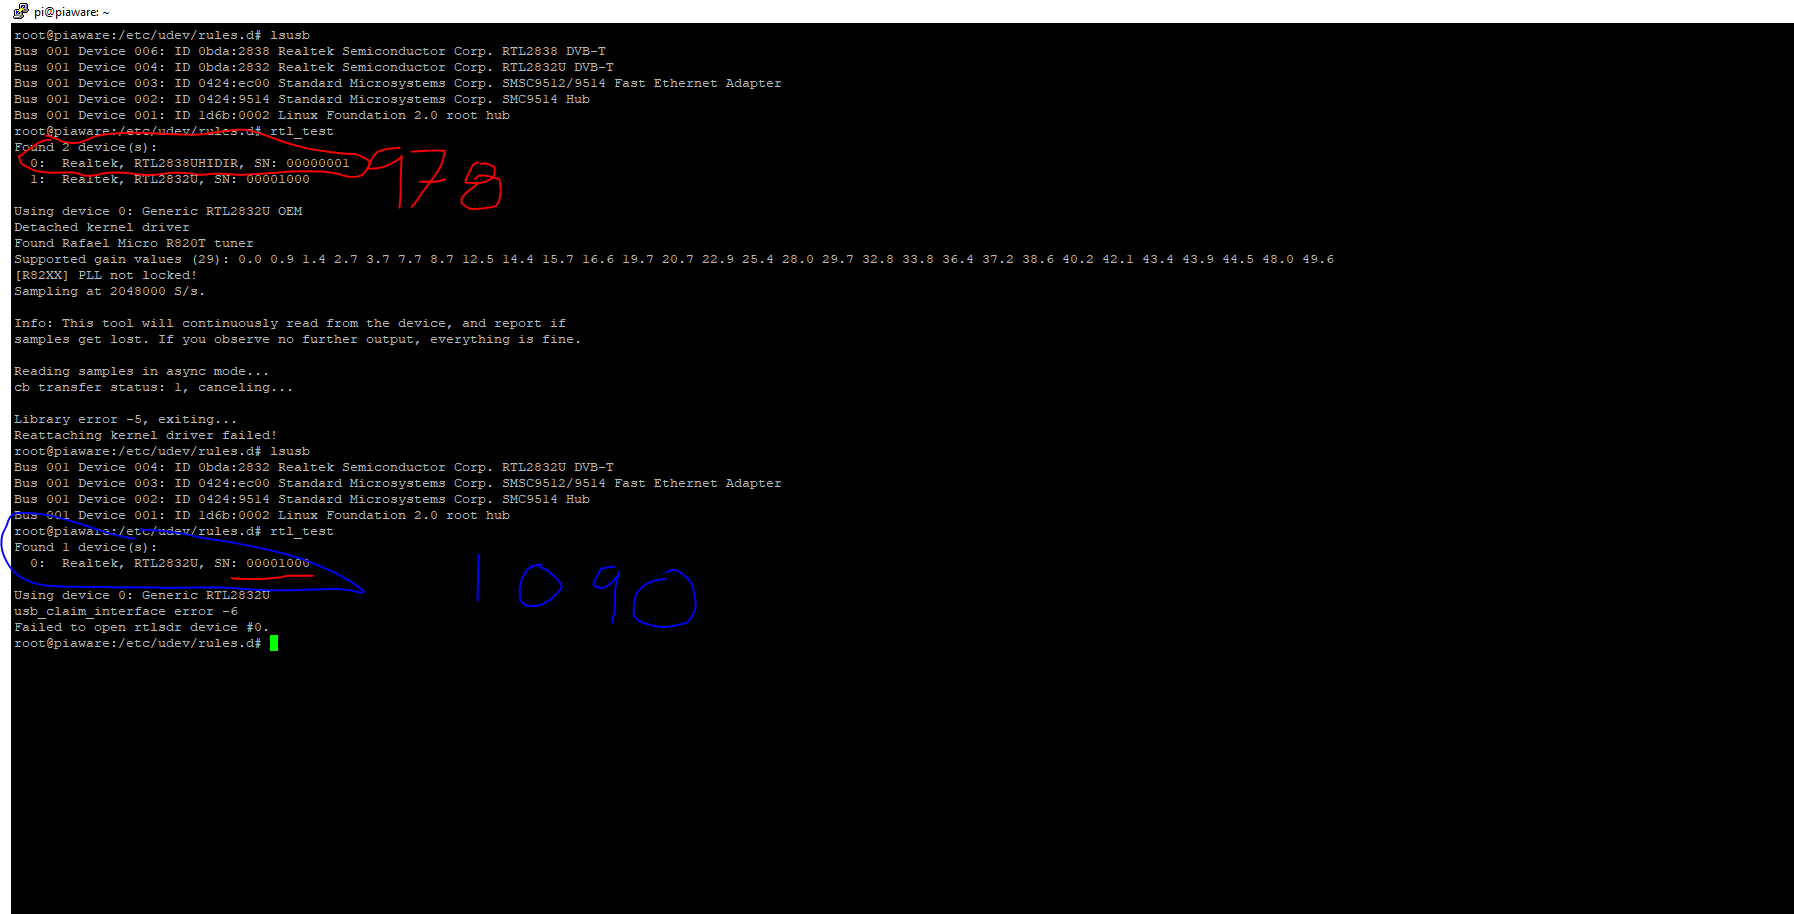
- If you are using the same Pi device for both 1090 and 978, as in your Pi is running two USB antennas/receivers, you’ll need to determine which USB device is 1090 and which is 978. The easiest way to do this is to access your Pi and run “lsusb” and “rtl_test“. This will print out your USB devices. I plugged both devices in and ran the commands above then I unplugged the UAT 978 device and ran the commands again. You can see that my 978 device has serial number 00000001 and my 1090 device has serial number 00001000. This is very important to note because both the dump1090 and dump978 will try to claim the first USB antenna it sees and neither can claim both resulting in the inability to receive the intended flight data.
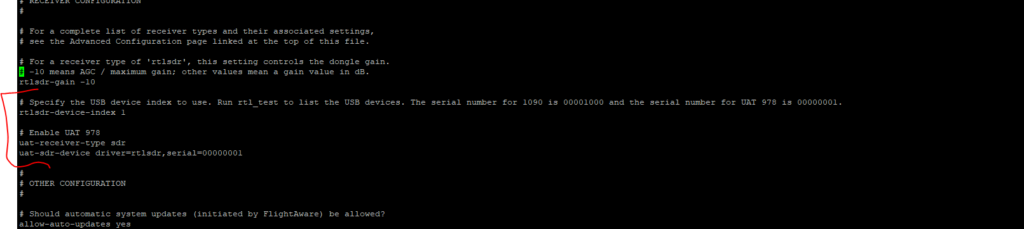
- Once you’ve noted which USB device is which, you’ll need to edit your PiAware boot config and add the dongle IDs for 1090 and 978. The configuration settings can be found here: https://flightaware.com/adsb/piaware/advanced_configuration#uatsteps. Make a backup of /etc/boot-piaware.config then run “nano /boot/piaware-config.txt” and add the following lines:
- “rtlsdr-device-index 1” (because my 1090 device is USB device 1)
- “uat-receiver-type sdr” and “uat-sdr-device driver=rtlsdr,serial=00000001“
- I added some # commented out notes to the config file because I suffer from CRS and years from now I won’t remember what I did in this config file. Totally optional.
- Write out/save changes and reboot your Pi. Once your Pi comes back up, check htop for both dump1090 and dump978 running. I can also see that my Virtual Radar and ADSBexchange feeder is running so I’m confident that I didn’t break anything. 🙂

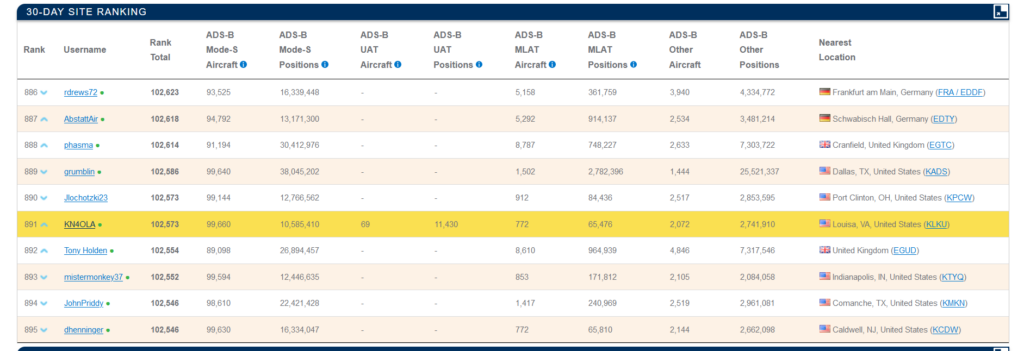
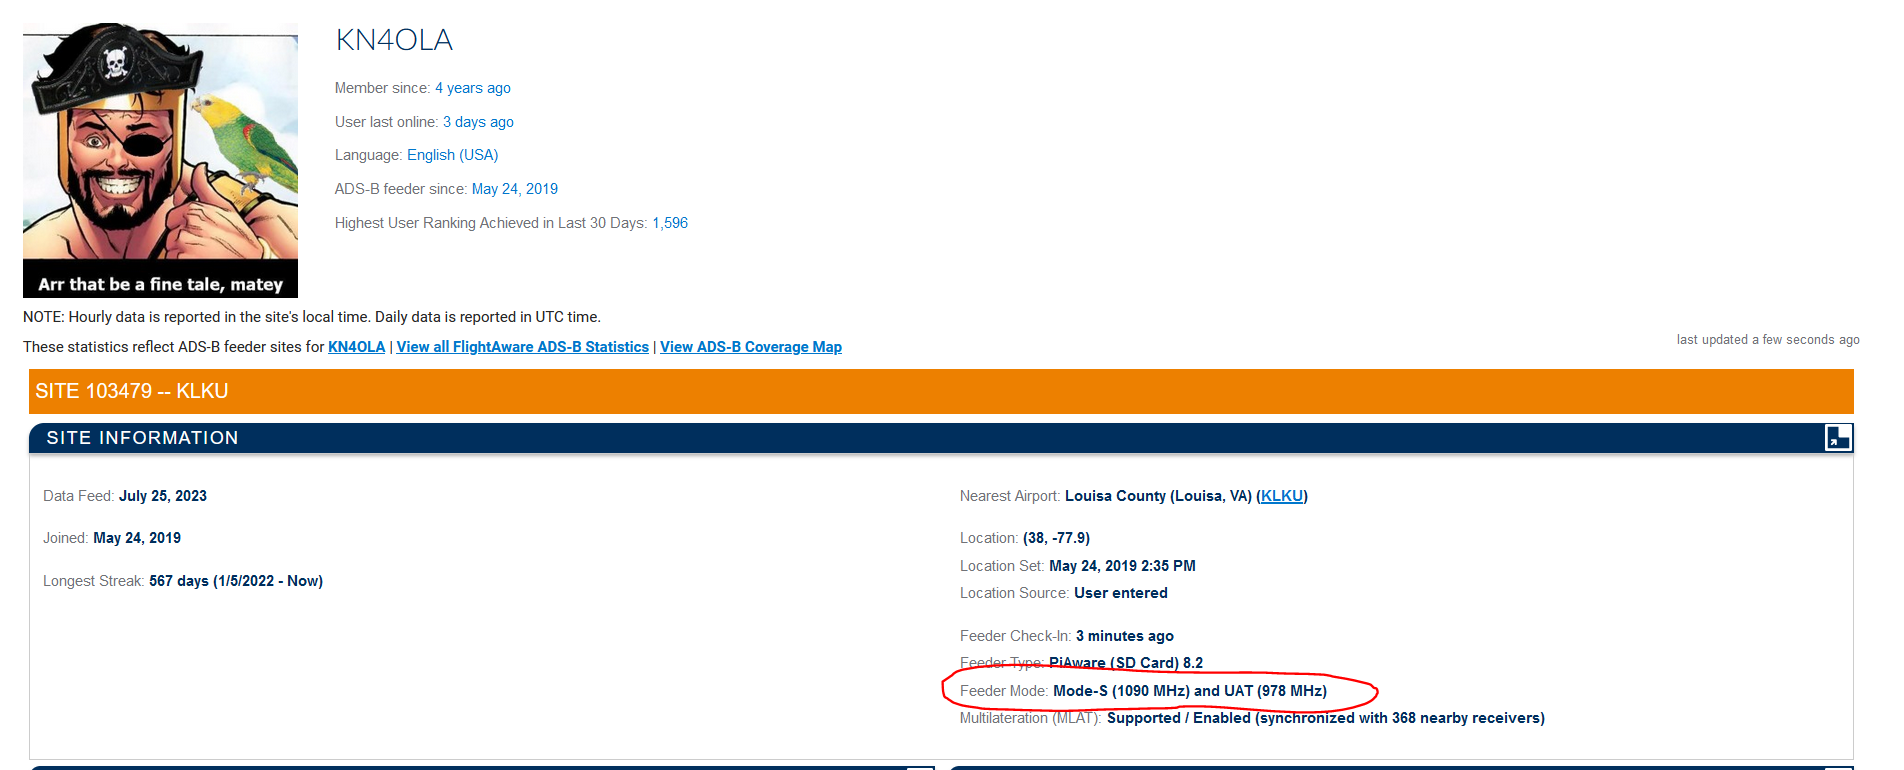
- Next, log in to FlightAware and check that your device is feeding ADS-B 1090 and UAT 978. If you did it correctly, you’ll see both listed. Mine can be found here: https://flightaware.com/adsb/stats/user/KN4OLA#stats-103479
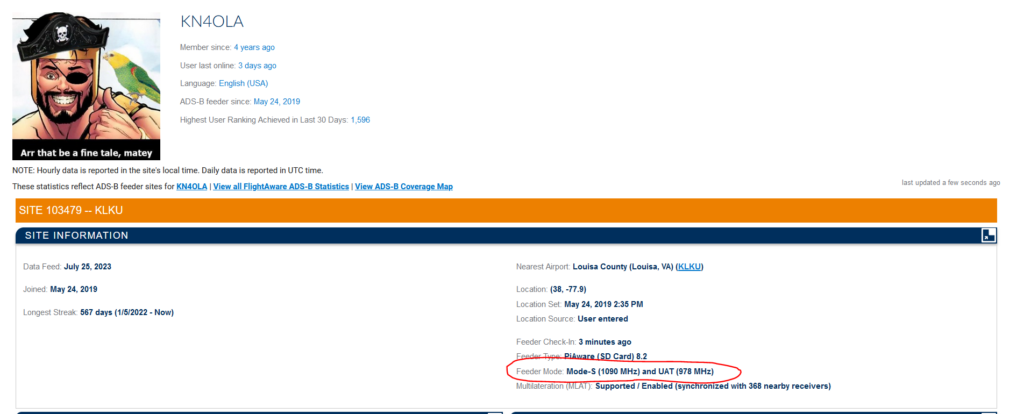
- I also noted that I’m the only feeder with UAT compared to my neighboring ranked sites.
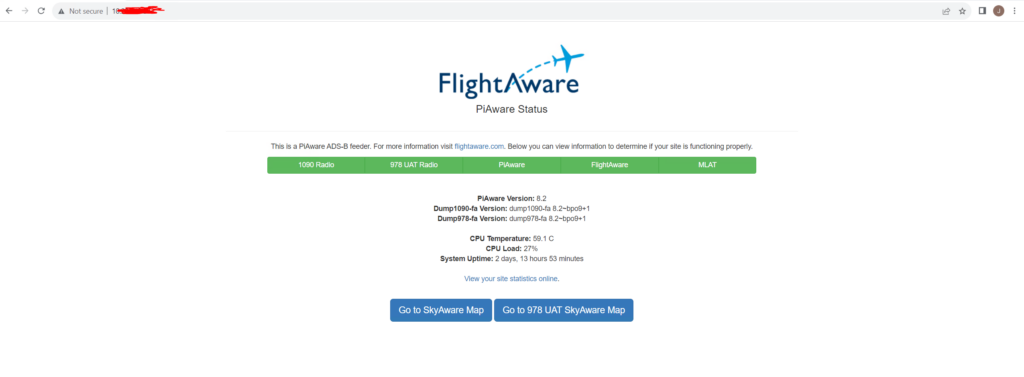
- If you check your local FlightAware status on your LAN, you should see 978 UAT green as well.
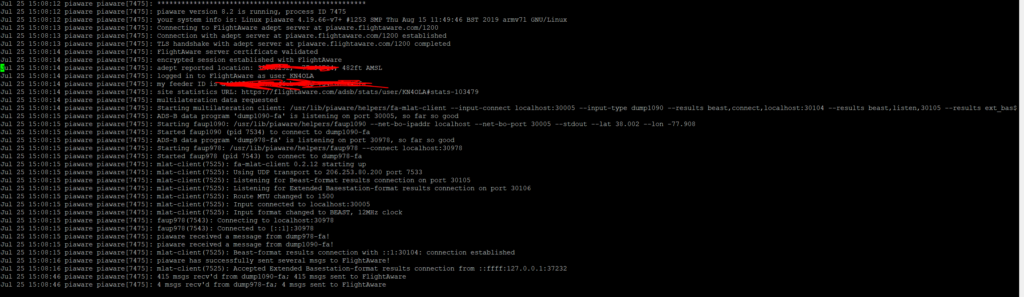
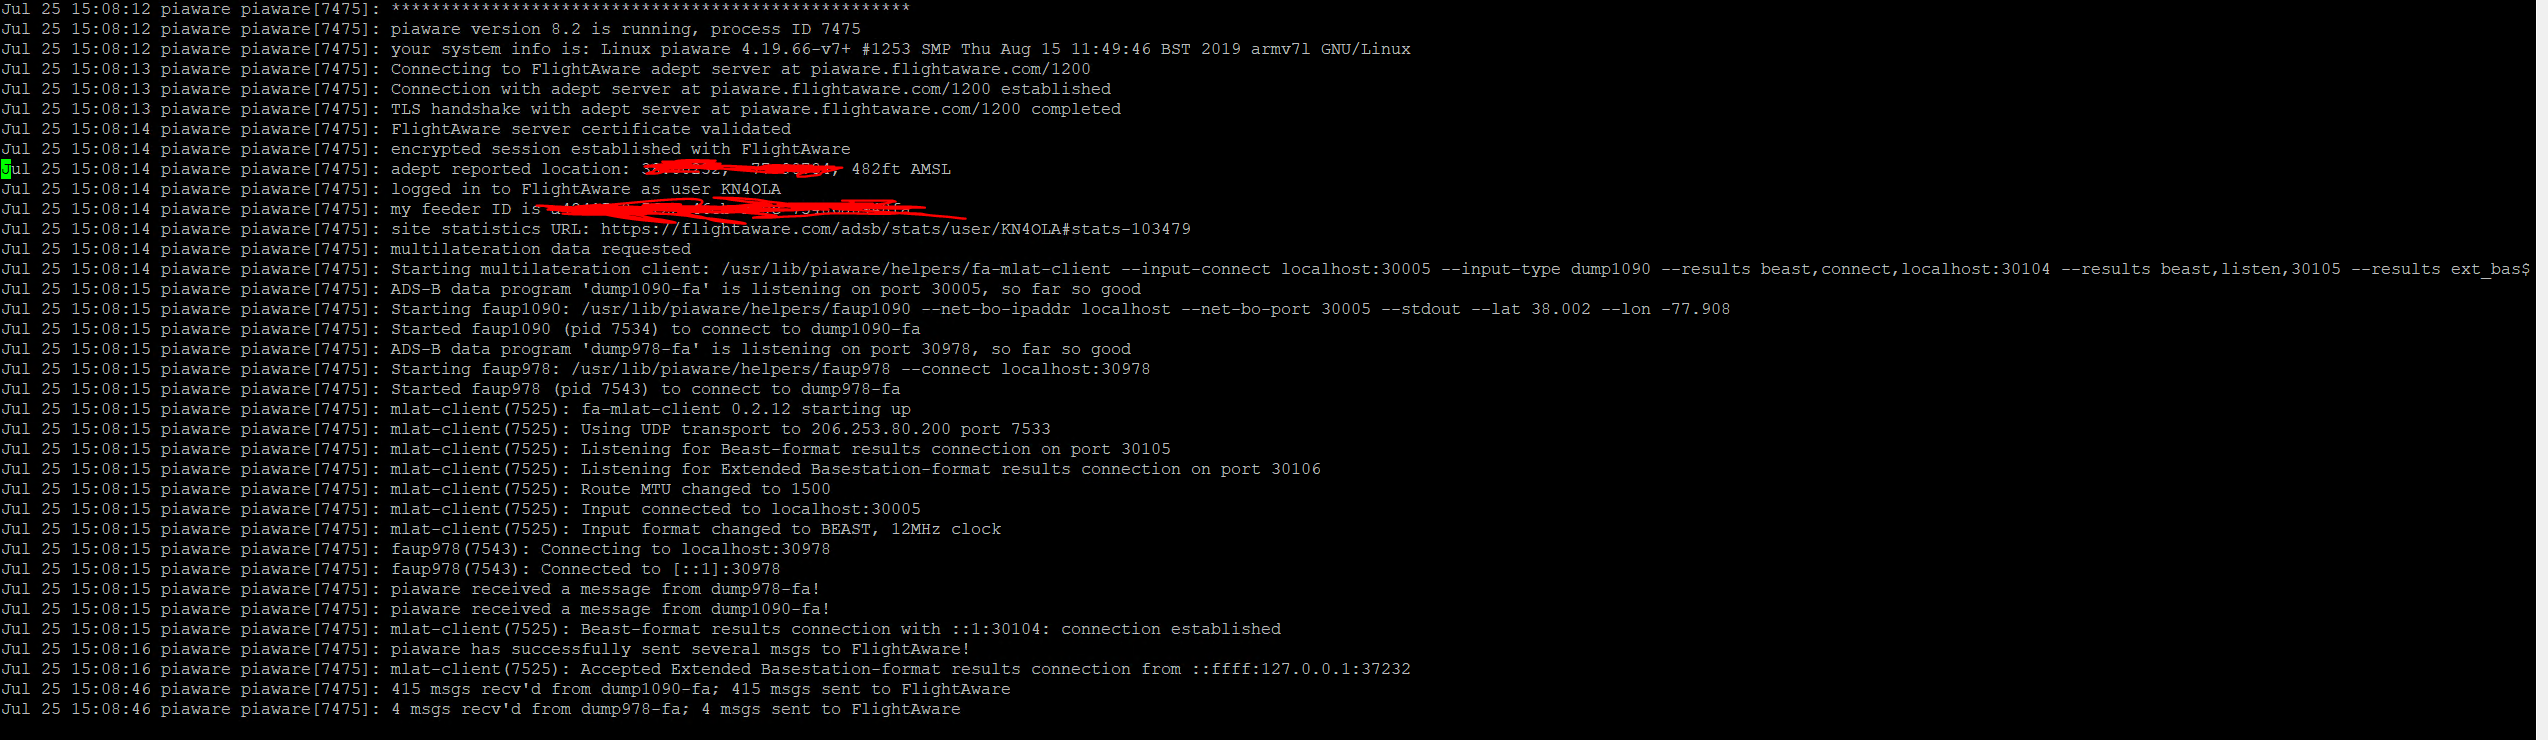
- And if you want to verify the log data, or if something isn’t reporting correctly, swing over to /var/log/piaware.log for details.
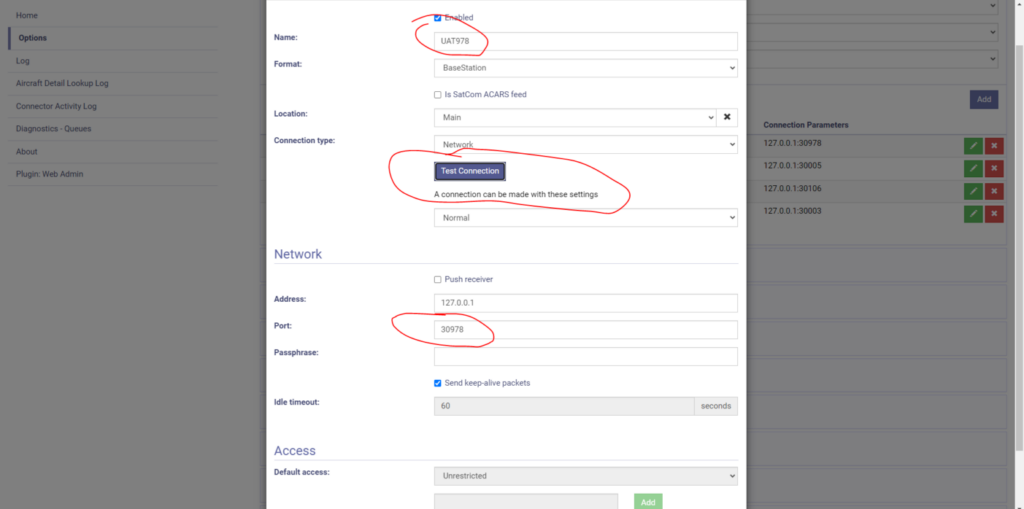
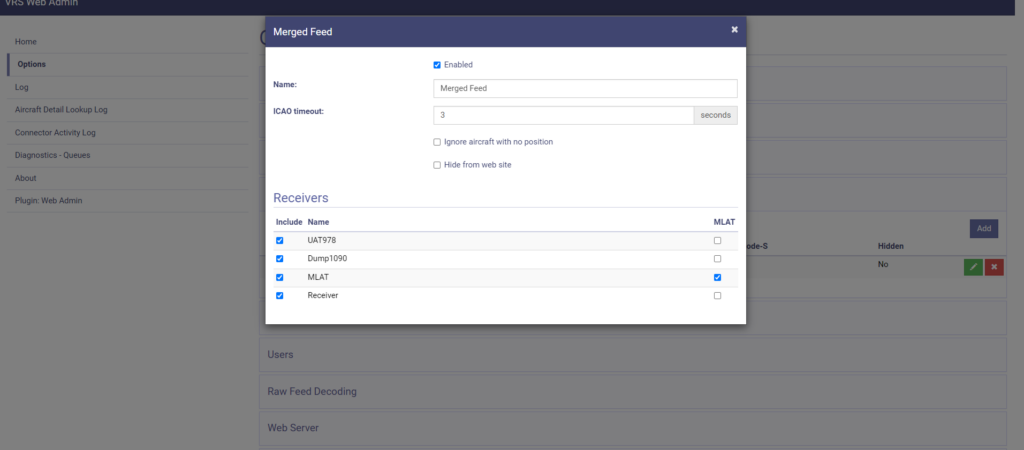
- Virtual Radar – Virtual Radar is kind of clunky, but it took me a long time to get it running before the days of ADSBexchange so I keep it around as a tribute to my coding efforts of getting a Windows-based program running on Raspberry Pi. Virtual Radar is pretty simple to configure for UAT 978 – log in to your Virtual Radar admin page and simply add the listening port for UAT 978 which is… wait for it…. TCP 30978.
- Go to Options on the admin page and add the port and host address information then hit save.
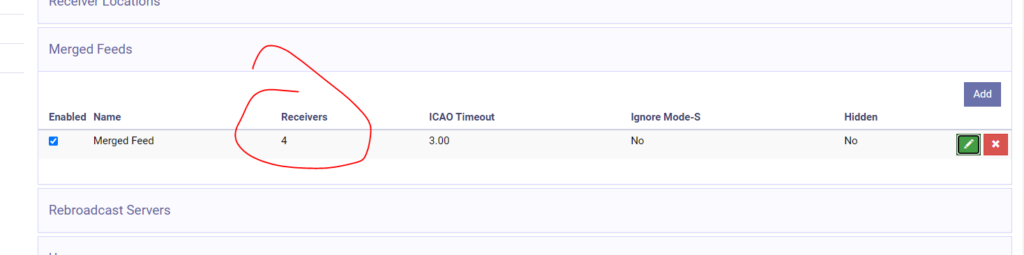
- Next, add it to your Merged Feed options.
- Confirm that you have 4 receivers in your Merged Feed then check the webpage where you host your Virtual Radar. This should wrap up Virtual Radar.
- ADSBexchange – https://www.adsbexchange.com/how-to-feed/ – Lastly, and my favorite of all three options, ADSBexchange. ADSBexchange is the simplest of all three – if you are feeding FlightAware with UAT 978, and you had previously configured your ADSBexchange feeder, then you will automatically feed ADSBexchange with UAT 978.
- I did update my ADSBexchange install to get the latest settings and add additional configuration for MLAT. I did that by running the following two commands and going through the setup process: “curl -L -o /tmp/axupdate.sh https://adsbexchange.com/feed-update.sh” and “sudo bash /tmp/axupdate.sh“.
- I also installed the stats packages to correct an error I was getting on the ADSBexchange webpage “curl -L -o /tmp/axstats.sh https://adsbexchange.com/stats.sh” and “sudo bash /tmp/axstats.sh“.
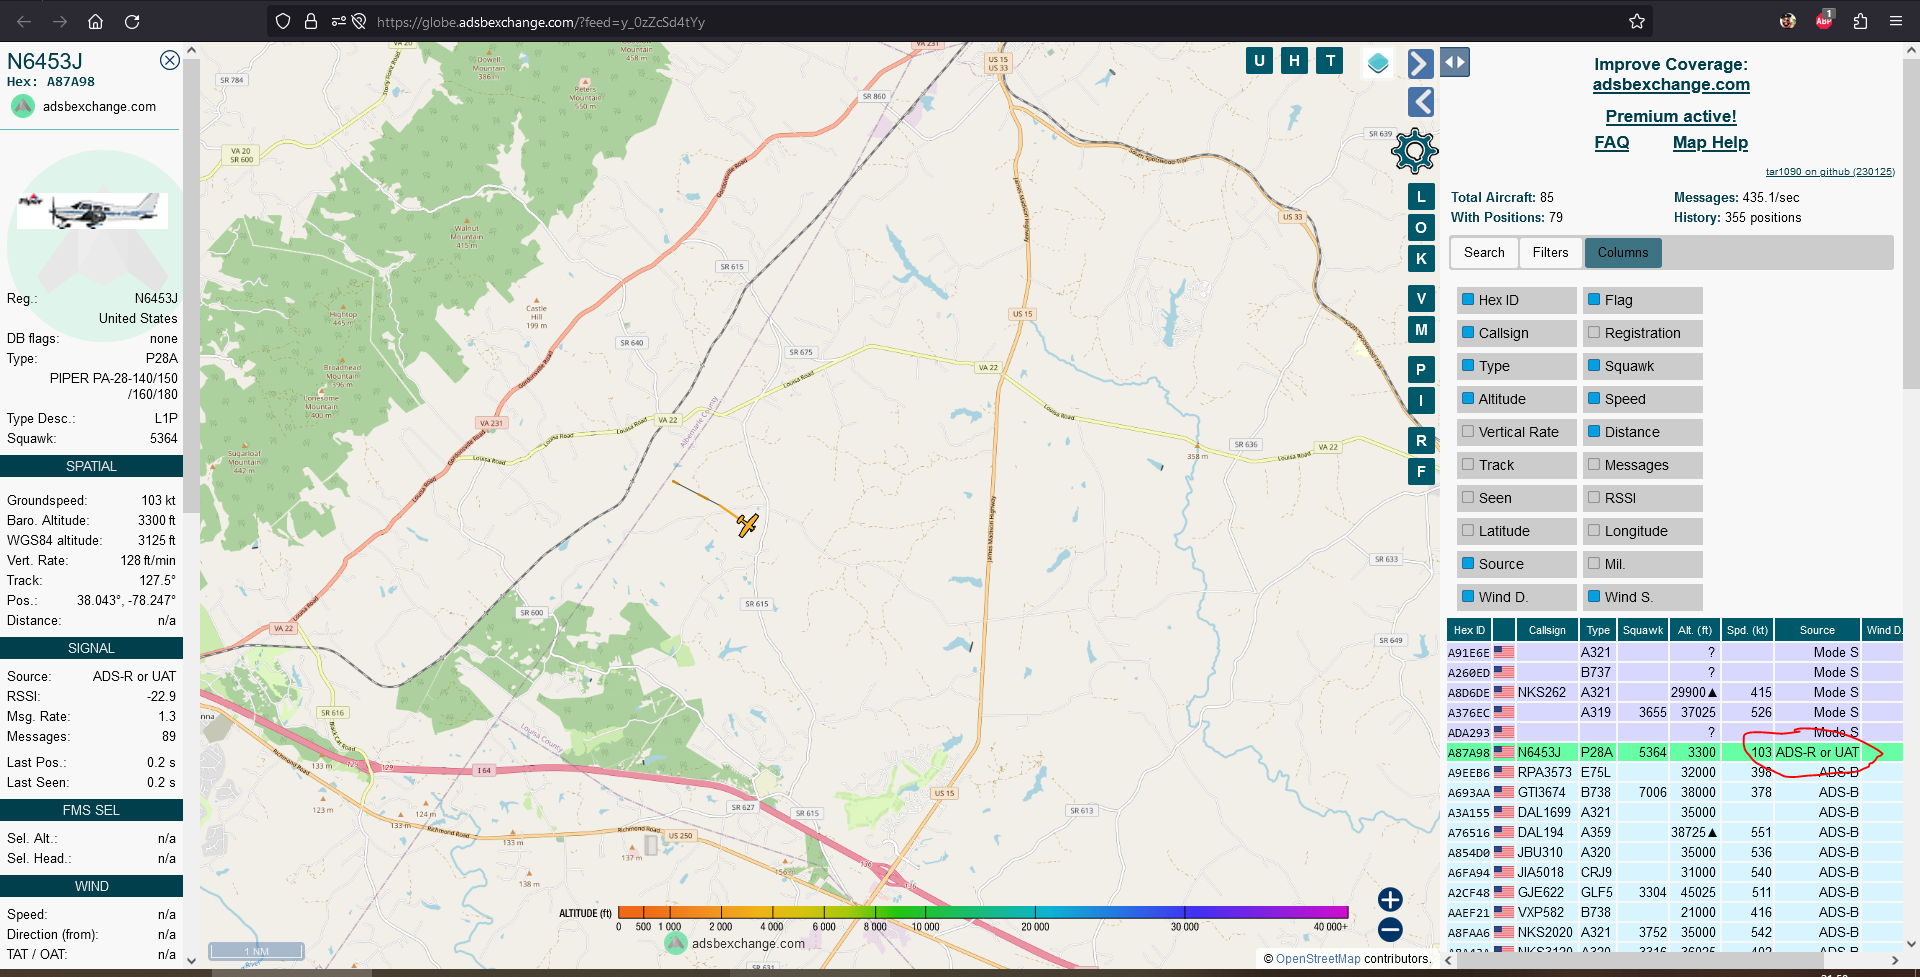
- Once ADSBexchange was operational, I checked my ADSBexchange map and had my first UAT 978 aircraft located.

- The ADSBexchange URLs provide much more information and it is opensource. Aircraft from from my site only: https://globe.adsbexchange.com/?feed=y_0zZcSd4tYy, my feeder stats: https://www.adsbexchange.com/api/feeders/?feed=y_0zZcSd4tYy&t=16900768651013, and MLAT map: https://map.adsbexchange.com/mlat-map/#.
- If you are using the same Pi device for both 1090 and 978, as in your Pi is running two USB antennas/receivers, you’ll need to determine which USB device is 1090 and which is 978. The easiest way to do this is to access your Pi and run “lsusb” and “rtl_test“. This will print out your USB devices. I plugged both devices in and ran the commands above then I unplugged the UAT 978 device and ran the commands again. You can see that my 978 device has serial number 00000001 and my 1090 device has serial number 00001000. This is very important to note because both the dump1090 and dump978 will try to claim the first USB antenna it sees and neither can claim both resulting in the inability to receive the intended flight data.


All in all, I am very happy with the results. The process was pretty straight forward and it helped that I had a feeder already configured for ADS-B 1090. This addition was long overdue and something I’ve wanted to add to my site for a while.
Many thanks to my daughter for helping me with the installation and my oldest son for helping me with some of the coding (mainly motivational support). 🙂